Step by step to your own encrypted Jaguar CD

Written by Matthias Domin
Thanks go to Carl Forhan, Glenn Bruner and Scott Walters

For this tutorial about creating an encrypted Jaguar-CD we use a rather small Jaguar-program called "HV.ABS".
"HV.ABS" just shows 2 objects moving over a black screen, the user can do not much more than use buttons A, B and C on the Jaguar-joypad in port 1 to exchange the graphic used for one of the two objects.
HV.ABS-screen showing two objects

Tools necessary in the CD-creation process are:
Additional file(s):
A ZIP-archive containing all the files discussed and processed in this tutorial can be downloaded from here:
CDTutorialFiles.zip (content list)

If you are unfamiliar with the Jaguar-Encryption, you can read here more about it.

Within 5 steps we run through the whole process of creating an encrypted Jaguar-CD:
  1. Define the CD-layout
  2. Collect and convert the track-files
  3. Burn the unencrypted CD
  4. Encrypt the CD
  5. Burn the encrypted CD

Step 1, Define the CD-layout

The Jaguar CD-layout is using (at least) 2 sessions, with the first session consisting only of audio-tracks and the second holding the game's data (programs, data, Cinepak-movies or additional audio-tracks) and the encryption-data.
The minimum number of tracks for the game-data in the second session seems to be 2, so it might be necessary to use a dummy track-file if you only have a single program-file which you want to put on an encrypted CD. And additionally it seems to be necessary to reach a certain amount of data (> 1MegaByte) with the non-encryption-data tracks of session 2.

General Jaguar CD-layout:
Session 1:
Track 1 This audio-track should contain a voice sample telling the user that this CD is not an Audio-CD but a Jaguar-game-CD.
Track 2 .. n Additional Audio-tracks.
Session 2:
Track 1 "Boot"-program, according to the Jaguar's Documentation this should be less than 64 KiloBytes in size.
Track 2 "Main"-program
Track 3..n-1 Additional data tracks
Track n Encryption-data

Please note:
Although all the official CD-docs emphasize the above mentioned 64KB-limit for the Jaguar-program in the bootrack it is possible to use larger files for it. MAKETRK will output a warning about this, but will process the bigger file and the Jaguar will read in the complete file.

CD-layout for our example:
To keep the example simple we use a "game" consisting only of a single, small program file called "HV.ABS".
Session 1:
Track 1 An audio-track
Session 2:
Track 1 "Boot"-program, we can use our "HV.ABS" for this as it is <64KB.
Track 2 Dummy track, needed to make the encryption-verification process happy.
Track 3 Encryption-data


Step 2, Collect and convert the track-files

For the audio-track in Session 1 we will use a WAV-file called WARNING.WAV, luckily the CD-creating-tool we use - CDRecord - can deal with WAV-files directly, so no need to convert it.

All the tracks of Session 2 have to have a certain layout which is described in the Jaguar-CD-documentation, so some convertion is necessary, Atari has provided tools for this called MAKETRK and PADCD.
Jaguar-programs put on CD should be plain binary files, without any header. The file-extension "ABS" would indicate that "HV.ABS" has a header which need to be removed, but "HV.ABS" is in fact a plain binary already, so we can use it directly for the next convertion-step. The only thing we need to know is the load- and startaddress in the Jaguar's RAM for HV.ABS, which is $4000.

Now we create a proper track-file out of HV.ABS using the tools MAKETRK and PADCD.
As this will become the boot-track of the CD the call to MAKETRK is slightly different than for the other tracks:
MAKETRK -b4000 -z HV.ABS
PADCD +100000 HV.T00 HV.RAW
(further description)

After this we create the dummy-track out of the above mentioned PM_DUMMY.DAT-file:
MAKETRK -z -t1 -mTRAK PM_DUMMY.DAT

PADCD +100000 PM_DUMMY.T01 PM_DUMMY.RAW
(further description)

The last track in our CD-layout serves as a dummy for the later created real encryption Hash-table, we use a file called TRK_2B.RAW for this, the digit "2" in its name should indicate the track-number (zero-based) and the letter "b" should indicate "beta".

Layout for the unencrypted CD:
Session 1:
Track 1 WARNING.WAV
Session 2:
Track 1 HV.RAW
Track 2 PM_DUMMY.RAW
Track 3 TRK_2B.RAW


Step 3, Burn the unencrypted CD

We use 2 CDRecord-calls to create the unencrypted multi-session Jaguar-CD.
Please note that you need to check at least the -dev=0,0,0 parameter, if necessary you need to alter it to suit your environment!
CDRECORD -speed=1 -dev=0,0,0 -pad -audio -multi WARNING.WAV
CDRECORD -speed=1 -dev=0,0,0 -pad -audio HV.RAW PM_DUMMY.RAW TRK_2B.RAW
(further description)


Step 4, Encrypt the CD

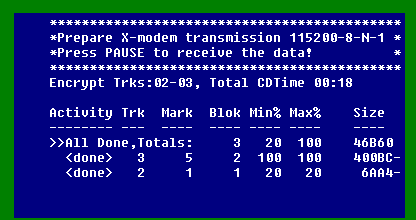
Now run the Jaguar-CD-encryption tool to get the Hash-table for the encryption-data track.
CD-encryption-tool V1.6
At the end of this step you should have a file called TRK_2.RAW. Make sure that it has the same size and layout as the up to now used dummy TRK_2B.RAW.

Hint:
If you are using my version of the CD-Encryption-tool then please save the received encryption-data under the name CD_HASH.DAT and then call PADCD to extend it to the size of the dummy TRK_2B.RAW:
PADCD -2 *100002 CD_HASH.DAT TRK_2.RAW


Step 5, Burn the encrypted CD

Layout for the encrypted CD:
Session 1:
Track 1 WARNING.WAV
Session 2:
Track 1 HV.RAW
Track 2 PM_DUMMY.RAW
Track 3 TRK_2.RAW, this is the only changed file in this layout!

Now burn the encrypted Jaguar-CD by issueing these two calls of CDRecord, please notice that the only difference to the two calls for the unencrypted CD is the exchanged last track of the second session with the encryption data:

CDRECORD -speed=1 -dev=0,0,0 -pad -audio -multi WARNING.WAV
CDRECORD -speed=1 -dev=0,0,0 -pad -audio HV.RAW PM_DUMMY.RAW TRK_2.RAW
(further description)